Vue.js for beginners: add a cart content component to the demo app of Vue Mastery
One learns the basics of Vue.js by building a product page in the great (and free) introductory course of Vue Mastery. The demo app includes typical web-shop features, like variations, availability, reviews, etc. And it is possible to add items to the cart too.
The app lacks a cart content display however. So I thought it would be great to create a component for that as an exercise in what has been learned by the course.
See the finished demo here: https://vue-store-page-demo.netlify.app/
Let's dive in: create the new Vue component
The first step is creating the new component. Let's do that in main.js.
Vue.component('cart-content', {
  template: `
    <div class="cart-content">
      <h2>Your cart</h2>
    </div>
  `
})
We want to use our component as a sibling of eg. the the product component so add it directly to index.html.
<cart-content></cart-content>(I assume that you already know the finished code of the course. You need to have it if you want to follow along. Or just read this tutorial if you will.)
So far so good. We just added a new section with a title to the product page. It isn't too much maybe, but it's a right start. And you can use the cart-content class to separate the new section visually from the other parts of the page with some CSS.
Show cart content in the new component
In the app you can add product variations to the cart already as I mentioned it. The information about added items stored in the cart array of the root instance. We have to pass this data to our cart component to make it do its job.
Let's add a props object to our component first.
Vue.component('cart-content', {
  props: {
    items: {
      type: Array,
      required: true
    }
  },
  // Template here.
})
The items property is an array, just like the cart and it is required.
Next add a custom items attribute to our component instance in index.html to connect it with the cart.
<cart-content :items="cart"></cart-content>cart and add the attribute as :cart="cart". But I decided to name them differently to make it more clear what we are dealing with.)
Now we have connected cart and cart-content but we (and the users of our app) still can't see any information. Let's change that! Print out items by updating the template section of our component in main.js.
template: `
  <div class="cart-content">
    <h2>Your cart</h2>

    {{ items }}

  </div>
`
Now when you click the Add to cart button you should see the id of the product variation displayed. OK, it works… but in a real app what a user want to see in cart content is not a bunch of meaningless numbers in square brackets!
Let's provide some more useful information instead!
(For more details about Vue props also see lesson 8. of the VM course. It's in the second half of the lesson.)Send more data to cart about selected product
When we add an item to the cart we should see there the name of the product with the variant color, and the price as a minimum. In the demo there is no price yet. So update the variants array in the product component first and add a variantPrice property to the product variants as well.
variants: [
  {
    variantId: 2234,
    variantPrice: 2.99,
    variantColor: 'green',
    variantImage: 'https://www.vuemastery.com/images/challenges/vmSocks-green-onWhite.jpg',
    variantQuantity: 2,
  },
  {
    variantId: 2235,
    variantPrice: 3.5,
    variantColor: 'blue',
    variantImage: 'https://www.vuemastery.com/images/challenges/vmSocks-blue-onWhite.jpg',
    variantQuantity: 12,
  },
  // Some more variants…
]
(To make this demo app more interesting and more realistic you could create some more product variants as well.)
Update the addToCart() method
The cart array and our new cart-content component is filled by the addToCart() method of the product component which looks like this:
addToCart() {
  this.$emit('add-to-cart', this.variants[this.selectedVariant].variantId)
}
As you can see this emits an add-to-cart event and passes the actual variantId as the information.
We want to send a whole bunch of information about the selected product variant to the cart however not just the variantId. Because of that let's create a cartItem object which contains all the data we want to provide and pass that item as the second argument of $emit().
addToCart: function() {
  let cartItem = {
    product: this.product,
    variant: this.variants[this.selectedVariant].variantId,
    color: this.variants[this.selectedVariant].variantColor,
    price: this.variants[this.selectedVariant].variantPrice,
  };
  this.$emit('add-to-cart', cartItem);
}
Now when we add product variants to the cart we see all all the information we wanted to see in the cart-content component. Something like this:
[ { "product": "Socks", "variant": 2238, "color": "purple", "price": 2.99 },
{ "product": "Socks", "variant": 2237, "color": "brown", "price": 3.99 },
{ "product": "Socks", "variant": 2236, "color": "red", "price": 3.5 } ]
Well, it is the data indeed, but it is still in a format what can be enjoyed by no one but just hardcore geeks. Let's fix that!
(For more details about emitting events see lesson 9. of the VM course.)Display cart content nicely in the component
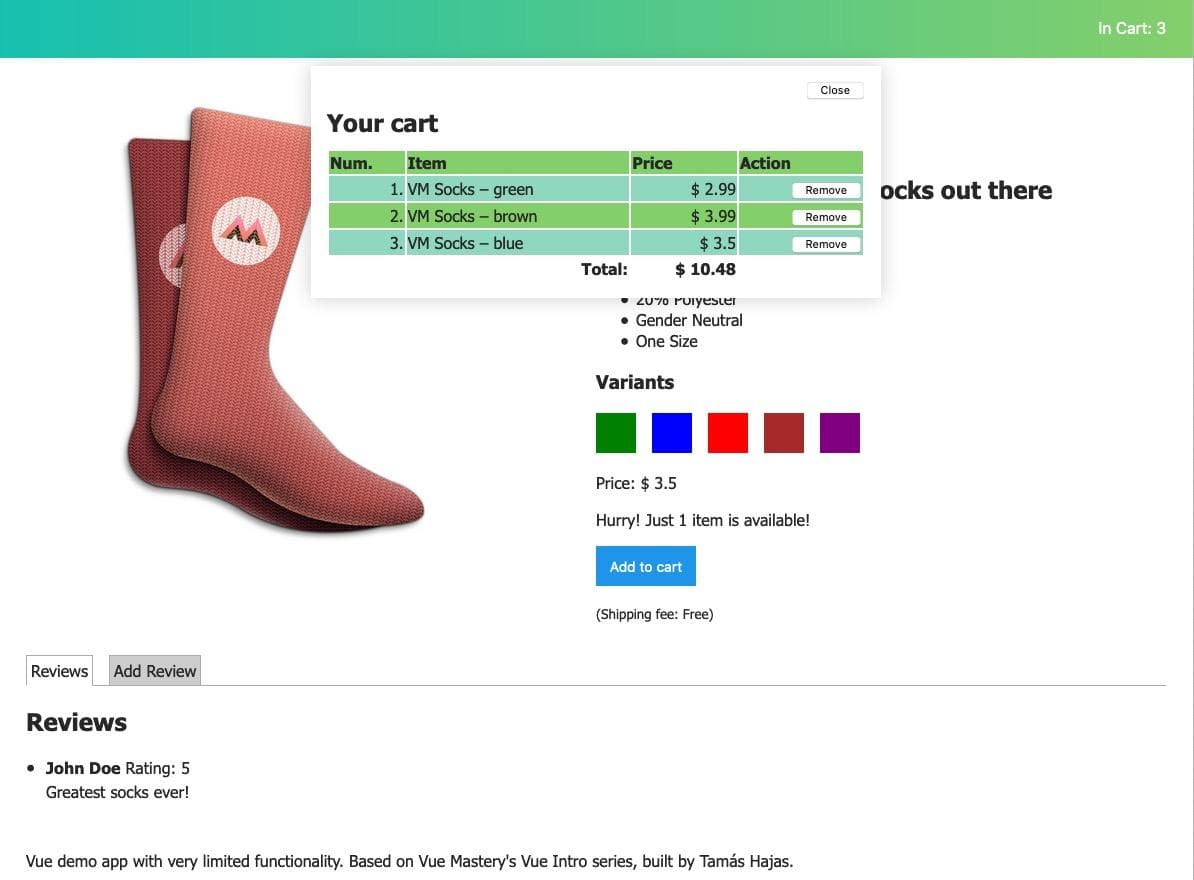
Displaying the cart content in a user friendly way won't be hard at all – I promise! We just loop over the items array and display the data pieces in a more understandable format. I chose HTML table as it is what this information needs to be semantic I think.
We should update the template of cart-content like this:
template: `
  <div class="cart-content">
    <h2>Your cart</h2>

    <table v-if="items.length">
        <thead >
          <tr>
            <th>Num.</th>
            <th>Item</th>
            <th>Price</th>
          </tr>
        </thead>
        <tbody>
          <tr v-for="(item, index) in items">
            <td>{{index + 1}}.</td>
            <td>{{item.product}} – {{item.color}}</td>
            <td>$ {{item.price}}</td>
          </tr>
        </tbody>
      </table>

      <p v-else>Your cart is empty. 😞</p>
  </div>
`
What happens in the code above? We use v-if to display the cart items table if the items array has any elements. If it is false the empty message found at the end of the code block and managed by v-else is displayed.
However when items has at least one element we display a table which has three columns. The header of the table is static and defines what can be found in the columns. But in the body of the table we use v-for to iterate over the items array and generate the table rows.
The first cell displays the item number. (We add "1" to the loop index because the average non-coder user still does not know that counting starts with zero. 😉) In the second cell we print the product name and the color values of the actual item and in the third and last cell we do the same with the price.
And thats all. Now cart content data is displayed in a human friendly way (especially if you write some CSS to to make the table look good)!
(For more details about conditional rendering see lesson 3. of the VM course. To learn more about usingv-for see lesson 4. of the VM course.)
To be continued!
It is not the end of the tutorial, but we finish the first part here. To help you see the whole picture here is a codepen which contains all the developments we made so far.
Stay tuned for the second part however in which we further enhance the our cart-content component and our app with features like:
- Calculate total price
- Make the cart component show or hide clicking the cart button
- Add cart close button
- Make cart items removable
- Reduce variant quantity by adding to cart
- Make deleting cart item increase variant quantity
See you in the second part!